Pages

Monday, December 29, 2008

Oven Thermometer


I picked this oven thermometer from Pantry Magic, the day when I was there to attend an ice cream demo.

I had read from the bakery books the inportance to have a calibrated oven so that we know we are baking our stuff at an appropriate temperature. Mine is the Brandt oven so I never doubt its ability to churn up the right amount heat. Given the mindset, this thermometer was more of a novelty to me then a necessity. It's time to affirm my trusty oven, I thought.

When I chucked it in my oven for play-play last week, I came to realised that the temperature of my oven was actually lower than it actually is. The knob says 180C but the reading on the little round face says 165C... surprise surprised.

How I managed to get away in the past is anyone's guess.

Apart from the lower actual temp of oven, I also get to the exact amount of time taken for the oven to reached the designated temperature. Now I no longer need to tikam-tikam when come to heat matter.

Cool agh!

Thursday, December 25, 2008

Be Thankful...


A former colleague sent me Xmas greetings, and there's a powerpoint slide which left me pondering. I am thankful for him sharing the insights.

Remember… throughout the year, be thankful for what you have…

If you have food in the refrigerator, clothes on your back, a roof overhead and a place to sleep ...
You are richer than 75% of this world.

If you have money in the bank, in your wallet, and spare change in a dish some place ...

You are among the top 8% of the world's wealthy.

If you woke up this morning with more health than illness ...
You are more blessed than the million who will not survive this week.

If you have never experienced the danger of battle, the loneliness of imprisonment, the agony of torture, or the pangs of starvation...
You are ahead of 500 million people in the world.

If you can attend a church meeting without fear of harassment, arrest, torture, or death ...
You are more blessed than three billion people in the world.

If your parents are still alive and still married ...
You are very rare, even in the United States.

If you hold up your head with a smile on your face and are truly thankful ...
You are blessed, because the majority can, but most do not.

If you can hold someone's hand, hug them or even touch them on the shoulder ...
You are blessed because you can offer healing touch.

If you can read this message, you just received a double blessing that someone was thinking of you, and furthermore ...
You are more blessed than over two billion people in the world that cannot read at all.

Have a good day, count your blessings,
and pass this along to remind everyone else how blessed we all are.
You are wished a Merry Christmas


Remember… throughout the year, be thankful for what you have been blessed with

Wednesday, December 24, 2008

Ho Ho Ho...Merry Xmas!

Am busy... cos Sheen's class is half day today; I have to dash to collect him soon. As with all school holidays... I will be too busy with the kid rather with the bakery and blog.
Like to wish all my friends and fellow bloggers a very joyous festive seasons!

Before I go, may I leave you with some stuff that just came out from my kitchen in the past hours. They are all eggless :

Choc cake for Sheen Xmas Party:
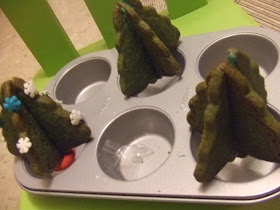
3D Xmas Tree... a bit disappointed with how it turn out:


Look familar? Ya, it was improvised from my last choc cookie recipe.

Pal, tell me if I have lived up to your expectation agh?

Tuesday, December 23, 2008

5 Little Pigs

This little pig went to the market.
This little pig stayed home.

This little pig had roast beef.
This little pig had none.
This little pig cried "Wee, wee, wee, wee!"All the way home.


I believe most parents have sang this familiar nursery to their little ones. I loved to see mine curled and giggled when I tickled him as I go"wee wee wee all the way home".

The last we had a little-pig moment was more than a year ago.

Now's now a big boy who wants only Ben 10 and Power Ranger. Oh yes, he also asked if I could me made him the cute piggies, a craft made by the older kids in his childcare centre:


His ever doting mum burns the restful hours in the evening to make him these little pigs:


I couldn't decide if I like the smile...

Less is more.... so I leave out the smile:


As I was rolling the fondant, I suddenly thought of a colleague KW who has 2 lovely daughters. We hardly meet each other now as he is now seconded to Ministry of Trade. I thought this would be a simple gift for him and his girls.
Just too bad when I text him, he responded:

> I am in Dubai. Only going back to SG on Thursday morning.

> Orhhh.


One man's lost is another man's gain. Since I already packed this to office, I let the ladies share among themselves!


How to Do:
Fondant
3 round Cookie Cutter of various sizes
Piping Gel (to stick the fondant
pink colouring
Food Marker

  1. Just cut out 3 circles with the cookie cutter and put the smaller one over the bigger one.
  2. Use the skewer to make 2 nostrils on the snout.
  3. Cut out the 2 ears and stick it on with some piping gel.
  4. Roll a tiny piece of fondant and curl it over a skewer to make tail. Stick it on with some piping gel.
  5. Mark the eyes with marker.

Monday, December 22, 2008

汤圆人团聚 (Tang Yuan)

Yesterday (Dec 21) was the Dong Zhi (冬至), one of the most important festive in Chinese tradition. Dong Zhi, which literally means the "Arrival of Winter", marks the day of the longest night and shortest day.

Accordingly to Wikipedia, this celebration can be traced to the Chinese belief in yin and yang, which represent balance and harmony in life. It is believed that the yin qualities of darkness and cold are at their most powerful at this time, but it is also the turning point, giving way to the light and warmth of yang. For this reason, the Dong Zhi Festival is a time for optimism. Dong Zhi is celebrated in style. The longest night of the year is a time to put on brand new clothes, visit family with gifts and to laugh and drink deep into the long night.

If you are familiar with Thanksgiving in the Western culture, 冬至is our Easterner's equivalent!

For as long as my memory serves, the night before 冬至, mum will bring out a big round enamel tray which she first used to make the glutinous rice dough. She said the longer you knead the dough, the better the tang yuan will taste. This step is important, so she held fort. Then she will colour a small batch of the dough with the red dye.

My sis and I only come in when the dough was ready to be rolled. We pinched a small piece of the dough and rolled it between our little palms until it is perfectly round. Got to be perfectly round and evenly shaped so that we will be blessed with blissful marriage in time to come, so we were told

To be perfectly honest, the commercial 汤圆 taste much better than the home made ones which is rather bland without the fillings. However, it is for the fun and bonding to get the family together, chatting while rolling the glutinous rice dough into little marble size balls. I shared these fond memories with my only sis and I would love Sheen to keep the childhood memories as well as the Chinese traditions.

I started the ritual last year... which happened to be a total disaster. We invited sis's family to celebrate 冬至 together. I left the 3 kids to roll the 汤圆 and ended up there were more quibbling than rolling. And in the end, all the dough went into the garbage chute!

Things were more controlled this year. You see Sheen taking his responsibilities seriously...

Sheen was creative in making tang yuan of various shapes and sizes. He had snowman, and a caterpillar:


When I buy the commercial 汤圆, I will boil them in water, then add the cooked 汤圆 into warmed Sobe soya milk... Yummy. But in observation of the tradition, I served the dumplings in the home-made brown syrup.


汤圆
Ingredients:
1 cup glutinous rice flour
1 cup water
Gula Melaka to taste
Food coloring (optional)
Fresh ginger, sliced (optional)
Pandan leaves, knotted (optional)


Method:


  1. Pour the glutinous rice flour in a bowl and slowly add water until the mixture becomes the texture of dough. You may not need the entire cup of water. Knead the dough for about 5 minutes. You can divide the dough and add food coloring as desired.

  2. Pinch off pieces of the dough and roll it into small balls.


  3. Drop the dumplings into boiling water and cook them until they float - about 5 to 10 minutes.


  4. In the meanwhile, prepare a sweet soup by boiling water, pandan leaves and gula melaka. Fresh ginger can also be added to the soup.


  5. Served the cooked dumplings in the soup and served warmed.


汤圆 can also be stuffed with a paste made from grounded peanut, black sesame seeds or red beans.


Blurry pic is all I take when shooting in my dark dingy kitchen.

In the run up to Xmas...

Xmas is round the corner... I finally get down to make something more christmassy.


Snowman is my favourite... but I need to learn make the figurine more expressive.
Sheen loves this too cos there are lots of fondant for him to chomp!


I ruined the letters. BTW if you know of any better alphabet cutters, pls let me know.


I tried to make the all white xmas by having the white holly leaves on white fondant. White-on-white, you get the idea... but in the end I think most will not like the too-plain look so I choose white and baby blue combo.

If you are looking for some decorating ideas or step by step guide, may I suggest Jo's blog . She has the prettiest cookie and cupcake!

Sunday, December 21, 2008

寿桃 (Longevity Peach Bun)


Using the last recipe as a building block I made some changes to see if it improves the texture of the bread:
Dough:
100ml water
25g corn oil
125g Gold Medal unbleached Flour (10% protein)
125g Self Rising Flour (8.5% protein)
50g castor sugar
¾ tsp yeast

Filling:
Lotus paste, optional (avail from Sun Lik)

Red food colouring, optional

Method

  1. Put all the dry ingredients in a mixing bowl. Mix well before adding the liquid and fat.
  2. Knead until smooth. Leave it to rest for 30min.
  3. Divide the dough into equal portion. Flatten and place some lotus paste onto the dough before wrapping it up. Rest 30min.
  4. Steam over high heat for 8 mins. Serve warm.

I am using the peach mold which I picked up from Kitchen Capers' "storelette". Of course you can try shaping the bun into peach shape using your nimble hands but for a novice like me, the mould makes life much easier.

Once it is steamed and cooled, I used the red food colour + new paint brush to "paint" the peach. Like I always say, I am not cut to be an artist... a simple peach take me a long while to paint... I will need lots of practice, I know!


Learning:

  • I used 60g dough + 25g lotus paste. By the time it is steamed, the peach puffed up like you see here. I will reduce the portion next time until I find the right amount.

  • Once this is shaped, I left the dough in the mold all the way until it is steamed. Some of them have dents, some have "pimpled skin"... as a result of air trapped in the mold. Maybe taking it out of the mold will yield smoother & prettier dome. Again, I will report my learnings after the next attempt.

  • Texture wise, this is still not the fluffiness that I am looking for. But my mum says "it's like that... outside sell one also hard until it re-steam it." Thanks Mum for the encouragement!

Anyway, I am still trying to read up on the chinese bun but I find the resources really limited... those that I managed to find are usually written in Chinese... due to unfamiliarity with the terms, I am struggling! Even after reading 3~4 times I still half understood. Sigh!


As usual if you have tips for me, pls leave me a comment. Thankie.

Saturday, December 20, 2008

Green Tea Bread


After the not-s0-successful attempt at this bread, I calculated the liquid ratio of this recipe versus the tried-and-tasted ones which I found the ratio here is slightly higher. Just very slightly. With this suspicion, I try it out again with reduction of 10% liquid.

Instead of using raisin, I used the green tea powder which I bought awhile back. I added the pumpkin seeds toppings for the good fats and oil.


Results? As you can see, the bread was even coarser than the last one! See the large
air pockets! And I am sooo mad that I just wasted my precious matcha :-(


OK, I have overacted. To be fair, this bread is not is not garbage quality... it is soft enough for a spartanic breakfast. The problem is I expected a more refined bread like this or this.

My next step? Use a red marker and cross out this recipe in my thick folder. Bye bye!

Friday, December 19, 2008

Strawberry Cheesecake

I was so smittened by Rei's elegant strawberry cheesecake... and had wanted to have my copy-cat version. I scouted for the best strawberries and cream cheese. After having all the ingredients ready, I sat on the whole thing until the punnet of strawberries threaten to rot and mould... then I get down to the project...

BUT, after all the grand plans and ambitions I never get down to do the nice decor like hers. *tsk* Let's just call mine a "no-frill" version. :-)


I used another recipe which I have from the BlueKey Flour becos I do not have whipped cream which is required in Rei's recipe. Also since my cream cheese comes in 200g-tub, I apportioned all the ingredients accordingly.

Sweet Pastry Base
Blue Key Superfine Superwhite flour 200g
Butter100g
Eggs 24g ( ½ egg)
Icing sugar 50g ( ¼ cup)


  1. Beat the butter with sugar and eggs until light and fluffy.
  2. Sift the flour and gradually add to the butter mixture.
  3. Mix together until a dough is formed. Wrap the dough in a plastic bag. Let it rest in the refrigerator for ½ hour.
  4. Preheat oven to 200C. Roll out the dough flat between 2 pcs of greaseproof paper to a diameter of 22cm.
  5. Deposit the rolled out pastry on a greased tray and bake for 10-15min. After baking, cool pastry on a wire rack.
  6. Trim the pastry to fit the base of a 8” (20cm) springform or a baking pan.

Cheese Filling
Powder Gelatine 9.6g (I used 5 leaves)
Hot Water 80g
Castor Sugar 2 tbsp
Cream Cheese 200g
Evaporated Milk 48g
Vanilla essence 2 g (½ tsp)
Diced Strawberry 80g
Juice 48g (or water)

  1. Cream the sugar, cream cheese, evap. Milk, peach syrup and vanilla essence until smooth.
  2. Dissolve the gelatine in hot water and add to the cheese mixture. Mix well.
  3. Arrange diced strawberry evenly on top of the pastry base. Pour in cheese to cover the fruits. Allow the cake to set in the fridge.
  4. Prepare the jelly topping by boiling 35g of jelly powder with 160g of water. Allow it to cool slightly before pouring on top of the set cheesecake.
  5. Place cheesecake back into the fridge to allow it to set.

My Adaptations:
  • Pastry Base - I always keep some cookie dough in the freezer. So I used the sugar cookie dough instead making from scratch again. But if you are using this recipe here, you may omit the egg. My sugar cookie dough is eggless.
  • Juice - I puree some strawberries, then top up the amount with ready-to-drink Ribena cranberry juice which is sweet yet not overly sweet. A little sourish, something that I enjoy.

  • Sugar - I used 2 tbsp only. Just the right level of sweetness that I like.

  • Springform pan - I do not have the proper springform pan, so I use whatever I have... that's why my cake is so shoooort!

---------------------

See this lazy baker didn't do a proper pastry base by pressing it down tightly and evenly... What you reap is what you get!


In the end I am too shy to bring the awful looking cheesecake to office. I kept at home had the whole thing to myself! How not to get fat agh?

Thursday, December 18, 2008

馒头 (Mantou or Chinese Steamed Bun)


I used to think that the only difference between chinese bun and western bread is the steam vs bake. Big wrong assumption! No wonder when I used my usual bread to make bun (by steaming), the bun (or steam bread) turned out rock hard. Haha.

Bread uses high protein flour while bun uses low protein flour. So much I understand at this point, sorry.

But that didn't stop me from trying out Gina's Mantou recipe, from Kitchen Capers. I put in my method of making this without a bread machine.

Pardon the blur photo cos I made this at night and the lighting ain't ideal for photo.


Ingredients:
250ml water
500g HK Flour (I used all purpose flour)
100g castor sugar
1 tsp baking powder
1.5 tsp yeast


Method:
1. Put the dry ingredients into the mixing bowl. And mix well before adding the water.
2. Mix with a spatula until a dough is form.
3. Put on a lightly flour worktop and knead until smooth.
4. I left it to rest for 30min though I am not sure if this step is necessary.
5. Flatten the dough and divide it into equal pieces.
6. I flatten the pieces then roll it up like swiss roll. Set aside to proof for another 30 mins.
7. Steam over high heat for 8 mins.
8. Serve warm.


Baking Notes:


  • I do not have HK flour, so I use the unbleached plain flour. That's why my mantou ain't white like those you buy from outside.
  • It is soft and fluffy when warm, though not as fluffy as bread. I said this to manage expectation :-)

Anyway, this is much easier to make... less time consuming compare to the bread which must knead till thin membrane stage.

Wednesday, December 17, 2008

Go Go Power Ranger


Last month there I was ranting about Sheen's birthday cake... After all many days of trials, we didn't have a birthday celebration. What a shame!

The day before the celebration, Sheen teacher called to say that he had chicken pox. As it turned out, not chicken pox but a kindda of virus in the inner lips causing his face to swell like PIG! I was not exaggerating! The virus was easily treated with antibiotics but what it meant was the birthday party had to be called off since I do not want to go around spreading germs to other kids.

I actually ordered the printed icing image for his birthday cake but the printing was not so good; there are streaks of black ink across the image so I only salvaged the 3 small images from the 10x6.8".

From this:


To this:


Needless to say, Sheen was excited to see his fav show on the cakelette.

The rest of the cupcakes are given the Xmas touch. Packed this for his school next day:


His teacher kept asking me about the icing image... Ha, Customisation is BIG business!

The green frosting is very nice. I added some peppermint oil and a drop of green colour paste. The whole kitchen was minty for a while.


It (frosting) takes an extra step to cook the custard but it was an effort worthwhile! Bevis loves to eat the frosting so I always make sure it is made with organic butter!

--------------------

In my humble opinion, this is the best "buttercream" - it stays up well at room temperature, light and not so sweet.

6 tbsp AP Flour
2 cups of Milk
2 cups of unsalted butter, softened
2 cups of icing sugar
2 tsp vanilla extract
Peppermint oil, a few drops (optional)
Green Colouring, a few drops (optional)
  1. Cook flour + milk in a saucepan until the mixture is thick and smooth. Cover it with cling film so that skin will not form. Leave it to cool to room temperature, about 30min.

  2. Beat butter on medium high speed of an electric mixer for ~3min, until smooth and creamy.

  3. Gradually add sugar, vanilla extract. Beat continuously for another 3min until fluffy.

  4. Add the cooled milk mixture, and beat on medium high speed for 5min, until very smooth and whiter in colour.

  5. Cool and refrigerate for 15min exactly. Use immediately. If left in fridge for too long, it hardens and it will be impossible to spread or pipe.

Tuesday, December 16, 2008

Best Cookies I Ever Baked


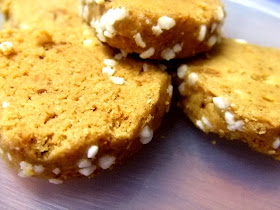
These cookie are heavenly! But don't bother to ask me for the recipe... I literally arm-twisted a colleague to give it to me. She in turn "steals" it from her family who owns the bakeries which sells these... Haha. I had to promise her never to leak it. Never ever in my life!


Needless to say, I was really excited as it is like doing something illicit that get my adrenalin going.

Over weekend I baked both... and followed the recipe to a T, something that's not usual of me!

The results, I must say that somethings in life are not equal! Here I have an excellent recipe, coupled with the best ingredients that I indulged, it was PERFECT! I brought it to office this morning and the guys who had it said it's like having afternoon tea at Hotel Intercon. My interpretation is that this is of 5-star hotel standard :-)))


This actually set me to wonder if the fault of those failed bakes lies with the recipe.... for my ego, c'mon, say yes!

All that I will reveal is that there's nothing unusual in the recipe. No strange ingredients. It is only the proportion, and the secret lies in the hardware.

Pal, in case you are reading this... tell me if I need to censor this part as well. I will take it down as long as you don't send me a legal letter =p