Pages

Banner

Tuesday, September 30, 2008

My Cookie Garden

After 3 continuous nights of baking, finally, here's the results:


Starting from scratch... with this:


and this:


to:


Little Miss Spider. The leg breaks easily, haiz.


Caterpillar. I like this shade of green!


"Blindly" Busy Bee...


A gaint flower baked in a floral cookie pan.


Another flower... tribal style.


The classic lady bird. I ruined the icing when my itchy finger go touch touch. tsk.


Meet my gypsy lady bird, dressed in gum paste daisies which was bought from Phoon Huat.


Eggless Butter Cookie
The recipe given by the school is the rather standard roll-out butter cookie recipe which you will find almost everywhere; on the back of a cookie cutter pack, flour packaging, cookbook!
The only difference is I made making it eggless and omit the baking powder (cos I want the cookie to retain its shape).

230g butter
200g sugar
250g plain flour, sifted
40g corn starch
2 tsp vanilla essence

Method:


  1. Preheat oven to 160-170C.


  2. Cream butter and sugar with electric mixer or wooden spoon until light and fluffy.


  3. Beat in vanilla essence.


  4. Add flour mixture, 1 cup at a time, mixing well after each addition. The recipe says the dough should be stiff but mine was not. I thought I missed the measurement or what ... so I made another batch - it is a very soft dough, at least in my case.


  5. If your dough is also soft like mine, refrigerate for few hours until it is hard enough for decent rolling and cutting.


  6. Baked 20min or until it starts to brown on the edge.


A few baking tips that I picked up from this round of baking:


  • Roll the dough directly onto the baking sheet or paper, cut out the cookie and remove the surplus around this. This method reduces the handling of the cookie dough, hence preserves the shape better, specially if you have cookie cutter with intricate design.


  • Freezing helps the cookie to retain the shape better during baking.

This one is decorated with fondant. I find ready-to-use fondant a breeze to use. Just open the package, grab a blob, dab on the colour, knead, and voila, all ready!
So easy that even my 3-year-old used the balance fondant to make his own cookies:


Kathryn's (the course instructor) work:


When my other course mates send me their pix, I will update them here.

More TangZhong Bread

Using the balance TangZhong, I made them into various flavour - Ham & Cheese, Rum & Raisin and Wolfberries.

Ham & Cheese:


Shaping Method:

  1. Divide the dough into 60g each.

  2. Roll into a triangle.

  3. Put a slice of cheese and ham on the base of the triangle. Roll it up.

  4. Slice the rolled bread into 2. i.e. each triangle = 2 bread
I know this shaping look confusing on words... if you are interested, pls drop me a line, I will draw you the pix and you will immediately know what I mean.


The cheese will melt and spread when baked, making the bread sticks to the baking pan. Next time I will put the sliced bread into the silicon muffin cup to bake for cleaner mess :-)


Rum and Raisin:

I soaked the raisin in rum overnight. Drain and pat dry with kitchen towels before adding to the dough.


Also, I replaced the white sugar with light brown sugar but the browness is still not showing through. Maybe molasses is a better choice - I will find out in my next trial.


Different flavour, same fluffiness.


I made this for my mum... she loves it! It disappears as soon as it is baked... so no photo... Just found 1 lurking in my camera. ha!

This is how it looks after the 2nd proofing. Ready to bake!


The bread is not very evenly baked cos I did this in a small toaster oven. Obviously, size does matter when it comes to oven!


Wolfberries:


I know wolfberries is full of goodness and tons of benefits... but sorry mum, I really don't like it *pout*!

Friday, September 26, 2008

TangZhong Bread

I get to know this bread-making method from Florence, thru Rei.

The bread is very soft and fluffy... the process is more cumbersome than the straight dough method but the results is worth every effort!


Step 1 : Make Tang Zhong:


Step 2: Making the bread dough. I do not have a bread machine, so I depend on my 2 hands to knead... but it was so sticky that after 15min, I give up and just left it as it is.


Step 3: Shaping the bread - punch down and knead light before dividing the dough into 50g pieces. Sorry no pix cos I did this 6 in the morning and had to rush to finish and send them into the oven.


Step 4: It rise beautifully to fit the silicon muffin cup. This is "kosong" breads... I only coat the outside with oats for some texture.


Step 5: Enjoy!


Sorry, no recipe cos I still do not have the originator's permission.

Wednesday, September 24, 2008

Vanilla Apple Cake

I baked this as part of the Sweet and Simple Bake's Bake of the Month.


The black stuff that you see in the cake is the black sweet cherries which I had from the previous bake.

This is essentially a basic butter/vanilla cake recipe, with apple toppings. I made this in a new silicon bundt cake pan.


*~*~*~*~*~*~*~*~*~*~*~*~*~*~*~*~*~*~*~*~*~

Vanilla Apple Cake
Recipe is from Sweet and Simple Bake, of course!

250g unsalted butter, softened, plus extra for greasing
250g golden caster sugar (I used 200g normal caster sugar)
4 eggs, beaten
250g self-raising flour
1 tsp vanilla extract
3 small Bramley apples, peeled, cored and cut into wedges (or any other type of cooking apple, if not apple of your choice)
2 tbsp Demerara sugar (or any other brown or white granulated sugar)
¼ tsp ground cinnamon

Method
  1. Preheat oven to 180C.

  2. Butter a 20cm/8” springform tin, then line the base with baking paper.
  3. Beat the caster sugar and butter together until the mixture turns pale and fluffy.

  4. Add the eggs, flour and vanilla extract, then beat together quickly to make a smooth batter. Tip into the prepared tin, then lay the apple wedges on top, poking them halfway into the mix. Don’t worry if the apples appear crowded – they’ll shrink as they cook.

  5. Sprinkle with the Demerara and cinnamon, then bake for 1 hour 5 mins, or until a skewer inserted into the centre of the cake comes out clean and the sponge is risen and golden.

  6. Leave to cool for a few mins, then release the tin and cool the cake completely on a wire rack.

    Note:
    Demerara is a type of unrefined sugar with a large grain, that is popular in Britain. it is normally brown in color—the natural color of cane sugar. Demerara has a coarse texture due to its large crystals. You can substitute Demerara with any type of brown sugar or white.

*~*~*~*~*~*~*~*~*~*~*~*~*~*~*~*~*~*~*~*~*~

If you use a good quality butter, you will be rewarded with a rich buttery aroma during baking! Yummy!

Tuesday, September 23, 2008

Touched by an Angel

Bevis asked for a pair for scissors last night. I saw him cutting a page carrying the "stop mosquito breeding" sort of advertisement.

Then he looked up and gave me a slip of paper "S-T-O-P" which he has cut. In his 3-year-oldness naivity, he said, "Mama, this is for you. When your boss scolds you, you take out this paper and tell him to S-T-O-P STOP!".

To me, this is the rawest form of love and concerns coming from the heart of a 3-year-old... If you are a mum, you can feel my euphoria. .

To the love that my little one has showered, I made this bear cookie which he has asked for weeks...

*~*~*~*~*~*~*~*~*~*~*~*~*~*~*~*~*~*~*~*~*~

Peanut Butter Cookie
I picked up the recipe from Nic's blog.


Ingredients:
1 ¼ cup all purpose flour
½ tsp baking soda
½ tsp salt
½ cup butter, slightly softened
½ cup brown sugar (I used 1/3 cup)
½ cup white sugar (I used 1/3 cup)
1 egg ( I replaced with 50ml of milk)
1 tsp vanilla extract
½ cup peanut butter (I used crunchy ones)


I love this peanut butter, best that I have tasted so far. Unfortunately it's only available at NTUC Finest.

Method:

  1. Preheat oven to 350F / 180°C.


  2. Sift together flour, baking soda and salt.


  3. Cream together butter and sugars. Beat in egg/milk, followed by vanilla and peanut butter and beat well.


  4. Add in dry ingredients and beat on low speed until combined.


  5. Drop by rounded spoonfuls onto parchment lined baking sheet.


  6. Using a fork, mark grids on the top of each cookie, dipping the fork in water after each cookie. ( this step is important is you want to get the pretty grid markings on the cookie)


  7. Bake for 11 to 12 minutes, until the edges just begin to turn brown.


  8. Cool on wire rack. Once cool, store in an airtight container immediately.


Note from Nic: I use natural, salted peanut butter. You get a more buttery cookie by using the natural peanut butter, since it doesn't have all that extra sugar. The cookie will also be more brittle/crumbly if you use processed peanut butter, so I would recommend adding an extra tablespoon of butter.

Monday, September 22, 2008

Kenny Roger Cornbread Muffin


I always love Kenny Roger's Muffin... whenever I go to the town office, I will drop by Great World City to lunch at Kenny Roger to savour their corn muffin.

I was in Kuala Lumpur recently for a workshop, and there's a Kenny Roger restaurant at the adjoining mall. They have several flavours of muffin on their menu, but I find them nothing close to what we have in Singapore. So much about standardisation!


This recipe was originally from here but I noticed that it has been taken off their site. Dear Lawyer, if you are reading this and need me to remove the recipe, pls drop me a line at info@i-dun-have-a-legal-dept.com

*~*~*~*~*~*~*~*~*~*~*~*~*~*~*~*~*~*~*~*~*~


Kenny Roger Cornbread Muffin

Wet ingredients:
½ cup (120ml) butter, softened
½ cup white sugar (original 2/3 cup)
¼ cup (60ml) honey
2 eggs
½ cup (120ml) milk
½ teaspoon salt

Dry ingredients :
1 ½ cups all-purpose flour
¾ cup cornmeal
½ teaspoon baking powder
¾ cup package frozen or canned corn kernels

Method:


  1. Mix dry & wet ingredients in separate bowls.

  2. Beat the wet ingredients until they are well mixed.

  3. Add to the dry ingredients and stir until just mixed stage (means the batter still lumpy), throw in the corn kernels.

  4. Fill muffin cups and bake 200C or 400F for 20-25min


*~*~*~*~*~*~*~*~*~*~*~*~*~*~*~*~*~*~*~*~*~


Baker’s Notes:

  • I very "sotong"... added 60ml of milk instead of 120ml. End up the muffin is hard hard hard! *Stupid ME*

  • I made it in silicon mould – no need greasing.


* And the interesting thing is, Bevis was the first to notice that the muffin was too hard. I didn't suspect a thing when I do the routine check by poking the toothpick into the muffin. As the muffin was left to cool on the rack, Bevis touched and said, "Ma, the cake is so HARD".

Bevis, you grow up to be a food connoisseur ok?

Saturday, September 20, 2008

Snow Skin MoonCake

Bevis attended the moon cake making class at Genius-R-Us together with his 2 fav cousins, Gwen In and Gwen Kit last Sunday - in our unique way, a mid autumn festival celebration.


Each of us took back 6 pcs of mooncake. Not bad for the fee that we pay. I only wish they would use the authentic disney mooncake mould... not these!


Mickey Mouse - doesn't look like to me, but that's what the instructor "claim" to be.


Tweedy Bird

Proud Bevis brought the boxes of moon cake to school on the following day to share with his teachers and friends. To a 3-yr-old, he deserves the recognition for begin able to roll, knead and mould the mooncake all by himself!


Doramon
I won't post the recipe here cos the rights is exclusive to the school. But if you care enough to learn, google and you will find many other blogger's version.

Hello Kitty

Tuesday, September 16, 2008

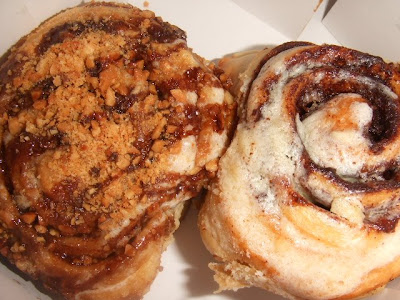
Cinnabon from KL

I love cinnamon bun... I had it almost everyday during my 1-year posting to KL.
What a shame they do not have any outlets in Singapore.


Peanut Cinnabon


Classic Cinnabon.