Pages

Banner

Showing posts with label Technique - Baking. Show all posts

Monday, December 7, 2009

My Rant and Rave


This was a long overdue post.
I have been so busy last few weeks arising from organisational change. I had to call up each and every staff to explain the situation, why and how... and the toughest part, managing their morale and emotions.


This is the first time in my career that I faced a gloom prospect, going thru' the same pain that most other firms are or had.

I am a half-glass-full person, I look at the bright side that the organisation is treating each and everyone with respect, and therefore gracious enough to provide the long notice period, and to provide alternatives to them.

Myself, i am just as drained at the end of each day. I am so stressed out by the time I leave the office. And I wanted to blog about it cos it does wonders for me to; I feel much light and relax. But I can't. I knew some funny poeple from the workplace spies here to fuel their next lunch gossips... you know who you are!

WhatI did: I blogged, then saved it in the draft. Only now when it is less sensitive that then I can click "publish". *tsk*

I made this batch of cookies after reading a post by a talented blogger/baker, Ovenhaven. She gave useful baking tips which really yield the nice crunchy cookies I soooo loved. If you read the angmoh recipe books, 99.95% of the recipes lead you to the chewy cookies. And the whole trouble is that I never like the chewy type. To me, they are like stale cookies. You know, like those left out in the dew for a night...

So I am quite thrill to use her method and got crunchy Sonoma's cookies, finally!


Incidentally, apart from following Ovenhaven's tips, I also double stack the cookie tray in the oven so that the cookies does not burn too fast, giving them more time to crisp up in the oven.

------------
PS: This was intended for post in October but due to the work-related content, I kept it in the draft box until now.

Thursday, October 23, 2008

Victoria Sponge

My first taste of Victoria Sponge was in my former company - an expat colleague baked a whole cake for me cos, over a casual meal, I mentioned I never tasted one before.

That was the very first time anyone had commissioned a cake in my honor :-)

We had some special friendship... I recalled once he lent his company car to me when he went back to London for 1-month home leave, for obvious reason to put it to better use. But I naively drove to work. This simple but brainless act raised some eyebrowns and was very quickly escalated to the HR. I couldn't care less about what was said or rumoured, all I knew my poor colleague was asked to explain on his return...=p

Back to the sponge. Right after I left the company, I never had a chance to eat Victoria Sponge anymore. One, I had not come across one in a local confectionary. Two, I can't bake then.


I was elated to find this recipe in Aunty Yochana's site. That brought back some memories, and I decided to bake it right away!


Yep, I have made this into cupcakes cos it is easier to share around.

Also, with Halloween round the corner, i am using the H'ween cupcake liner to add the festivity, and to prepare for my S&SB.


Victoria Sponge is not complete without the raspberry filling. I filled it with tip 230 using the filling method here .


Then cover the hole with a pumpkin quinn. =p

*~*~*~*~*~*~*~*~*~*~*~*~*~*~*~*~*~*~*~*~*~

Ingredients:
180 gm. Butter
160 gm. sugar
3 nos. eggs
30 gm. milk
30 gm. dairy whip cream
1 tsp. vanilla essence
180 gm. Self raising flour
finely grated 1 lemon zest
60 gm. raspberry or strawberry jam
snow powder or icing sugar to sprinkle

Method:
(1) Cream butter and sugar until creamy and fluffy.
(2) Slowly add in beaten eggs, fresh milk and whip cream. Add in 1 Tbsp. flour if the mixture cuddles. Add in lemon zest.
(3) Add in flour and mix thoroughly.
(4) Pour into 2 nos. 8" round trays and bake at 175C for about 40 mins or till cooked.
(5) Remove tins from oven and set aside for 5 mins before removing from the tin.
(6) Let it cool, spread the jam on one of the cake and top up with the other piece of cake.
(7) Sprinkle snow powder on top and serve.

Some notes on this bake:

  • If the batter cuddles, you will lose some air... to avoid this, make sure all your ingredients are brought out from the fridge well in advance. They should be at room temperature for an ideal bake.

  • I do not have lemon at home, so I replace with orange zest which adds some tangy-ness.

  • When baking into cupcake, the baking time is reduce to 25min. Check your oven 5min before and after for doneness. Over-baking will yield dry cake.

  • Icing powder melts easily in our climate. Try to use snow powder. Else, only powder the icing over the cake just before serving.

  • This batter will spread and level out itself when in the oven.

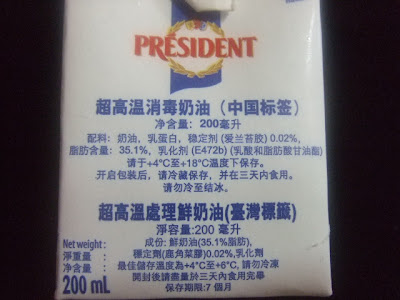
On the side note, i almost got a scare when i see the Chinese text on my whipping cream:

Haha, false alarm... it is made in France:
Well, better err on the safe side.

Before I part, let's pray for the victims of tainted milk in China... my heart goes out to them!

Monday, June 9, 2008

Baking with Kids

I love to involve my little one in my baking. Ok I'll be honest, that's becos I do not have a helper and this is the only way I can get thru a baking session! Having said that there are many good reasons why you should cook with your kids.


  1. Cooking is a life skill and teaching them early will help instill skills to last them a lifetime. This is important when they are on their own and won't have to rely on fast food and junk food.
    In my case, I hope this value added skills will help me have a better daughter-in-law.

  2. Kids love to do things themselves and being able to cook their own meals will help to build his self confidence. Trust me, it's a great deal to them as they accomplish a task!

  3. Kids love to eat what they cook. This is the easiest way to get them to eat more and eat healthy.

  4. Cooking together teach them teamwork. E.g. he knows he needs to ask for help to take stuff out of the hot oven.

More importantly, it create family time and bonding. I am sure these are fond memories that will stay with them. It may take a longer time to get thru the session with a kid but the moments with your children will be priceless. Before you go have a cooking session with your child, just bear in mind to have LOTS of patience. Remember never to lose your cool when there's spilled
stuff all over the place - I know it is easier said than done :-)


I chose this Vegan Chocolate Cake to bake with my 3-year-old. Well, it has to be simple cos a child of that age hasn't got much attention span to start with. With that in mind, you just need to pick a brainless recipe that does not need more instruction than his little fingers can count. *GRIN*

------------------------------------------------

RECIPE

1.5 cup all purpose flour
1 cup sugar
1 tsp baking soda (also called bicarbonate of soda)
1 tsp salt
0.5 cup cocoa powder
1 cup of coffee (or water/milk/buttermilk, I used coffee for a more flavoursome cake)
0.5 cup vegetable oil (I like grape seed oil... a healthier choice)
1 tsp vinegar
1 tsp vanilla essence (optional, I added for the aroma)
White chocolate chips (optional)

Method:


  1. Preheat oven to 180C.

  2. Mix all of the ingredients (except choc chips) well with a electric mixer or a wooden spoon until it is smooth. The batter must be free of lump.

  3. Stir in choc chips if you are using.

  4. Fill the muffin case to 80% full.

  5. Bake at the middle rack for 25min or until the toothpick comes out clean when inserted.

Yield 15 cupcake or 8" round cake.

Results:


  1. It rises to a beautiful dome without spilling to the sides. In future I will fill it all the way.

  2. Anyway, if your cake also turn out to have a high dome with cracks in the middle (see my 1st pix) - then probably the oven is too hot. I am an engineer and always like to explain things with science so please bear with me... The surface of the cake cooked very quickly, while the inside remained uncooked and unrisen. Next, the inside of the cake rose as it cooked and pushed up the already-cooked surface of the cake, causing the cake to dome and crack. To remedise this, just lower the temperature by 10C and bake for additional 5 min. And/or, add a small (oven-proof) bowl of water in the oven - the steam will moisten the surface of the cake so that it is not likely to crack as the centre of the cake rises. Having said this, do note that every oven is different; 180C maybe too hot for me, but could be jolly well be the right setting for you. So you need to test out the recipe and make your personal notes for future reference.
  3. The first time I reduced the sugar to 2/3 cup but I think 1 cup sugar taste better. If you still find it not sweet enough, you can add the chocolate frosting (which I did)
  4. It is moist and soft like the usual cake. In all fairness, you can't compare to the usual cake made with eggs but this is a great alternative when you run out of eggs. In fact this recipe originated from the depression era when eggs were short in supply.
  5. I find the sourish raspberry balances the richness & sweetness of chocolate very well. But you are free to experiment with any fruit that you desire. Go ahead, this is where you can get adventurous!


Chocolate Frosting
2 oz baking chocolate (unsweetened, semi-sweet etc)

whipping cream

icing sugar

  • Melt the chocolate in microwave or over a pot of hot water.
  • Mix with whipping cream & icing sugar until smooth.
  • Add 1 tbsp a time (1 tbsp cream + 1 tbsp sugar) until you get the consistency and sweetness that you want.

Monday, April 28, 2008

Simple Substitutions in Baking

Updated on Oct 28

Baking Powder:
1/2 tsp cream of tartar +1/4 tsp baking soda +1/4 tsp cornstarch = 1 tsp baking powder

Cake Flour:
Take 1 cup of plain, replace 2 tbsp of plain flour with cornflour = 1 cup cake flour

Note: Pls try to use the actual ingredients required on the recipe as the substitution maybe yield the same results in some recipes.

Sunday, April 20, 2008

Low Down on Cookies

3 basic method of making cookies

1. creaming method:
butter, margarine or veg shorterning and sugar are beaten together with electric mixer (or wooden spoon) until light and fluffy, then add in egg and other dry ingredients.

2. rubbing-in method:
flour is slowly worked into the fat with a pastry cuter or food processor or simply your fingers before egg, liquid and dry ingredients are added. This method is slower and one has to be very light fingered or the dough will be tough.

3. melting method:
Butter and sugar, honey, golden syrup are melted over gentle heat and then mixed with the other ingredients such as egg, flour and raising agent.


Basic methods in shaping cookie:

Roll out cookie:

  • Dough is roll out thinly and cut with a knife or cookie cutter, hence needs firm dough.
  • Roll the softer dough between the greaseproof papers and chilled in the fridge until firm enough to handle. This method is easier than to roll out the dough on a floured surface as too much flour will make the cookie tough.
  • For intricate design, it is easier to straight away rollout the dough on the baking sheet, cut out the cookie, then remove the excess dough around the cut-outs, wrap the dough and refrigerate for 15min before baking. This helps to retain the shapes better.
  • Some recipe will spread alot when baked. One good way to avoid that is to freeze the cutted dough for 15min before sending it into the oven.


Shaped and hand-moulded cookie

  • dough is soft but heavier drop cookie dough.
  • It should not be too sticky otherwise it will be difficult to handle.
  • Damp or lightly dust the hand with flour before handling the dough.
  • Work as quickly and lightly as possible – too much pressure will make the cookie too compact and hard.

Drop cookies

  • usually made from soft and light mixture, with ingredients like nuts and raisins added.
  • Mixture is soft enough to drop by rounded spoonfuls onto lined baking sheet.

Pressed cookie

  • easy to make : the smooth, creamy mixture can be pipe thru either a cookie press or piping bag into many shapes.
  • It can be baked plain or topped with fruits and nuts.


Sliced or bar cookies

  • easiest to produce: baked into 1 piece and then cut into squares and bars.
  • Dough is poured or pressed into the baking sheet and spread with a topping if desired.

How the ingredients affect Cookies

Flour:
  • High-protein flour, e.g. All-purpose flour. Makes cookies darker in color and flatter.
  • Low-protein flour, e.g. Cake flour. Making cookies pale, soft and puffy.

Fat:

  • Fat with sharp melting point, like butter: Makes cookies spread.
  • Fat that maintains same consistency over a wide temperature range, such as solid vegetable shortening: Makes cookies that do not spread as much.

  • Corn syrup (or molasses): Makes cookies browner.
  • Brown sugar and honey: Makes cookies that soften the longer you keep them.

You want the cookies to spread more:

  • Use all butter OR
  • add 1 to 2 tablespoons liquid (water, milk or cream -- not egg) OR
  • use BLEACHED all-purpose (but not one that is chlorinated) OR
  • add 1 to 2 tablespoons sugar.


You want the cookies to spread less:

  • Use solid vegetable shortening or
  • substitute some solid vegetable shortening for an equal amount of butter OR
  • use cake flour OR
  • cut the sugar by a few tablespoons OR
  • switch from baking soda to baking powder OR
  • chill the dough before baking it.

You want the cookies to have a chewy quality:

  • Melt the butter instead of simply using it at room temperature.

You want the cookies to have a cakey quality:

  • Use the butter at room temperature or use equal parts butter and solid vegetable shortening.

You want the cookies to be more tender:

  • Use cake flour OR add a few tablespoons of sugar OR
  • add a few tablespoons of fat.

The cookies are too tender and you want them to be more substantial:

  • Substitute a few tablespoons of bread flour for an equal amount of all-purpose flour OR
  • cut the sugar by a few tablespoons OR
  • cut the fat by a few tablespoons

You want the cookies to brown better:

  • Substitute 1 to 2 tablespoons of light corn syrup for an equal amount of sugar OR
  • substitute a few tablespoons of unbleached or bread flour for equal amounts of the all-purpose flour.

The cookies are browning too much, despite the correct oven temperature:

  • Substitute water for for an equal amount of liquid ingredients OR
  • use cake flour or bleached all-purpose flour

Source: baking911, Betty Saw "Cookie Galore"