Pages

Banner

Wednesday, July 29, 2009

Easy Mango Yoghurt Ice Cream (manual method)


Wanna join me for some ice cream on a scorching hot afternoon like today?

I need to use up some mangoes cos my family were all not well (finger crossed, not H1N1) and collectively refused to consume those mangoes that were on the verge of overriped. Decided to make them into sherbet that my nieces love! This recipe adapted from aunty yochana is good cos I can enjoy home-made ice cream without investing in an ice cream maker!


*************************************
No Churn Mango Yoghurt Ice Cream

300 gm. fresh mangoes
20 gm. sugar (sweetness depends on how sweet the fruits are, taste and add more along the way)
200 gm. whipping cream
200 gm. yoghurt (preferably mango flavoured) - original qty 100g
Juice from 1 lemon

Method:
(1) Measure yoghurt, sugar, mango and lemon juice into the blender directly. Blend until it becomes smooth.
(2) Whisk whip cream until stiff.
(3) Fold (1) into whipped cream.
(4) Pour into a container and freeze overnight until it's firm.

*************************************


My Notes:

  • I have reduced the sugar drastically from 100 to 20g cos mango is sweeter than strawberries.


  • I find that President UHT Liquid Whipping Cream (avail at most supermarket) taste better though it is more difficult to whip. The easy option is to use non-dairy whipping cream as Aunty Yochana does.


  • Ice cream will taste less sweet when frozen, so need to make it slightly sweet before folding into the whipping cream.


  • Pakistanist Mango is in season now; it does not look appetising cos the pulp looks very pale... but it tastes terrific! In contrast, R2E2 which looks good was not as great when used in ice cream.


  • I used more yoghurt to use up the leftovers, and also to up the nutrient value. You can use less if desire.


  • I find that the lemon juice lifts the taste of fruit, accentuates the flavour of mango. I won't skip this :-)


The homemade ice cream is of pale yellow which is closer to ivory. The mango taste is authentic despite being light - I probably will increase the amount of mango to 500g next round. Another easy (and cheaper option) is to add mango essence or emulco but for homemade goodness, I won't take that route. Go ahead and call me snob *GRIN*

Sunday, July 26, 2009

65°C TangZhong Pork Floss Bun

This is another great bread recipe... very soft bread without any bread improver. Stay soft for 2 days.
I like the puffy rounded shape; not sure if this is a one-time wonder or attributed to the recipe!
----------------------------

65°C TangZhong Pork Floss Bun
Step 1:
Prepare 65°C TangZhong
80g water
15g flour
Combine flour and water in a small (preferably heavy bottom) saucepan. Stir until the mixture smooth. Place it over low heat. Due to the small qty, it will burnt easily so you have to watch carefully and keep stiring with a heat-proof spatula or whisk.

Use the thermometer to check when the mixture reaches 65°C. Alternatively, try writing a 8 with the whisk - it should stay visible.
You will have ~90g of tangzhong now.

I add them directly into the mixing bowl which I am going to use for preparing bread dough later. To save time, I keep stiring it with spatula until it is cool to touch. If you leave it to cool on its own, use a cling wrap cover directly over the surface. This is to prevent a "skin" forming.
Step 2:
Prepare the main dough. You will need:
250g bread flour
1 tbsp skim milk powder
~90g TangZhong (I use all I get in step 1)
105ml warm water
4g salt
25g sugar
12g fresh yeast (or 5g dry yeast)
25g unsalted butter

Method:
  1. Mix all the ingredients with a spatula.
  2. grease (or flour) your hand lightly and knead until the dough is smooth and elastic. Form a ball, then leave it to rest in a cover bowl until it doubles in size. Timing will depend on the ambient temperature.
  3. Remove dough and lightly deflate the dough. Divide the dough into 50g portion, shape round and leave to rest for 10 min.
  4. Roll out the dough, and wrap some filling before sealing the dough. Careful not to let the filling touch the edge; if it does, the dough will not seal properly.
  5. Place dough pieces into baking tray and let it prove till about almost double in size.
  6. Bake at 175 - 180°C for about 20 minutes.

Pork Floss Filling:

120 gm. pork floss
50 gm. Mayonnaise
1 Tbsp. condense milk or sugar
50 gm. soft butter
  1. Toss them up in a small bowl.

My Notes:

I usually like to use Alex Goh's sponge and dough method, but when I do not have time to prove the sponge, I use this tangzhong method. Both gives me soft bouncy bread that last for 2 days (that's the longest I ever kept the bread).

Saturday, July 25, 2009

Chocolate Cupcake


This is what I baked for the primary school gathering more than a month ago. These days I have little time to bake, and even less time to blog... sigh.

Anyway I quite like the pictures here. Sheen, then just watched Monster vs. Alien, loved heroine Susan so much. He told me to share the cupcakes with Susan:


Steamed Moist Chocolate Cake Recipe from here.

I thought of this recipe cos I saw Art of Eating baking this recently so came my cravings. I doubled the qty and got about 35 cupcakes.

But becos of the limited space in my wok, I have to bake them instead. I felt it loses the m-factor when baked. Next time will stick to steaming.

Of the under-baked Angel Food Cake


This is my failed Angel Food Cake.

The part on the crown is still wet... it can't be underbaked cos this is the part that sits on the black baking tray... not likely to be unbaked at this part.

I have been thinking hard what causes it... anyone any idea?

Tuesday, July 21, 2009

What we had for dinner?

Last Sunday, was intending to bake these for the Monday breakfast morning. Since rain kept all of us homebound, the hungry tummies turned to these bread; were all finished up by my sister's and my family in 1 sitting. End up having to make a 2nd round.... luckily it helps to keep some ready dough in the fridge.

Otah bun, adult's favourite:

Cranberry and Raisin roll:


Pork Floss bun:


There's another tray of sausage roll... all whack by the kids before any pix were taken. Btw, Dot, here's the brand of sausage I used for the bun.


Recipe from Alex Goh's “Baking Code”
adapted to be eggless.

Overnight Sponge
100g bread flour
60g water, room temp
5g fresh yeast (or ¼ tsp instant yeast)

1. Mix the instant yeast with 20g of water until well blended. Add in the remaining ingredients and knead to form a dough.
2. Let it proof for 30min. Wrap with cling film and keep in the refridgerator overnight or upto 48hours.
3. Yield 152g sponge.

Ingredient A
550g bread flour
80g sugar
6g salt
20g milk powder
25g fresh yeast (or 10g instant yeast)

Ingredient B
150g overnight sponge (i used all 152g)
Ingredient C
320g cold water

Ingredient D

75g butter

Method:

  1. Mix A until well blended. Add B, then C, knead to form a dough.
  2. Add in D, knead to form a smooth and elastic dough. Cover it with cling film. Allow it to proof for 45 min (or until it double in size).
  3. Divide the dough into 50g portion, mould it round. Allow it to rest for 10min.
  4. Roll the dough flat, then roll it up like swiss-roll. Allow it to rest for 10min. Repeat the step 1 more time, wrap with filling as desired.
  5. Let it proof for 50min or until double in size.
  6. Bake at 200C for 20min. Remove it immediately from the baking tray when baked.

This is one of my favourite basic sweet bread recipe. It is soft but not not cottony soft like those commercial bread - something I dislike cos it contains too much bread softener etc to make it so artifically soft. I have long forgotten how they taste until I had some (cos my MIL bought too much). When it was a day old, it became gummy and stuck to my gum as I chewed.

In contrast, the homemade day-old bread may not be as soft but it does not give the unpleasant taste and texture!

Monday, July 20, 2009

Yeast... the soul of bread


I happened to find fresh yeast, or cake yeast as it is sometimes called, at a bakers' supplies in Hong Kah Point. Adventurous as I can get, I bought a block. It's 500g for $2.50.

I know 500g is helluva yeast but now that my electric stand mixer is broken, bread is the next thing I can make.

Also, if you read recipes like a novel as I do, you will know that every baker raves how fresh yeast produces bread with better texture and flavour. I guess its time for me to validate the claims now ;-)

If you are also keen to make your life more difficult by ditching the instant yeats, here's the some guidelines I have gathered:

  • To convert recipes calling for fresh compressed yeast to instant yeast: Use 0.4 times the weight; e.g. 10g dry yeast = 25g freah yeast
  • Cake yeast should be white or light brown in color and crumble easily. It should have a pleasant yeasty smell. If it is dark brown, moldy, soft or gummy, it is either spoiled or has been stored improperly; simply discard.
  • >
  • Cake yeast must be kept refrigerated or frozen because cake yeast is highly perishable. It must be used before the expiration date if stored in the refrigerator, but you have more leeway if stored in the freezer. It has a refrigerated shelf life of about three to four weeks from the date of manufacture and can be frozen up to three months. (my notes: some website says if frozen, shelf life is infinite)
  • Do not leave fresh yeast out of the refrigerator for more than 30 minutes.

I have already calculated the yeast qty in all my favourite recipes :-)

Passing on the Blogger Award


I hereby annouce my nominees of the Kreative Blogger Award:

1. Laureen at Eat and Be Happy - I wished I have her flare of photography and writing.

2. Art of Eating - for being such a darling mum to her 2 kids.

3. Elyn - the (enterprising) queen of chiffon cake!

4. Natalie at CupcakeLoft - the best bittersweet choc cupcake in SG, JB and some says Batam!

5. Halimah - my respectable baker churning out all things vegetarian!

6. Pook at Daily Delicious - Can't get enough of her step-by-step crystal clear illustration and beautiful creations.

7. Ovenhaven - creative design and engaging writings from a pretty young lad!

8. Teo Pau Lin aka Ms Crummb - the only person who can make a failed bake looks fun and enjoyable!

PS: I have exceed my quota but they are all too good not to be included so I decided some rules are meant to be broken.

------------------


Ok here the boring bits; Here the rules of the game:

1. You must thank the person who has given you the award.

2. Copy the logo and place it on your blog.

3. Link to the person who has nominated you for the award.

4. Name 7 things about yourself that people might find interesting.

5. Nominate 7 other Kreativ Bloggers.

6. Post links to the 7 blogs you nominate.

7. Leave a comment on which of the blogs to let them know they have been nominated.
------------------

I did not start out to create a chain but to let you know that you are a fantastic baker in yuor own rights!


Do accept the nomination as it was from the bottom of my heart, and I looking to know you better thru' the 7 things about yourself!


Friday, July 17, 2009

Bak Kwa Bun


Although ABin5 is easy, traditional bread making is fun. I really enjoyed the repetitive motion of folding, turning, and pushing... a perfect way for me to de-stress at the end of a hard day work!

Moreover, the artisan bread in ABin5 is gravitated towards angmoh's eating habit. We people here prefer bread with soft crust and filling.... YES, the filling. The artisan bread is too soft (almost fluid) to hold any filling :-)

So I am getting back to my same old bread that takes a long proofing, kneading and shaping!

Basic Sweet Bread Dough (adapted to be eggless)
http://forum.kitchencapers.net/phpbb/viewtopic.php?t=1265
Original Recipe from Alex Goh - The World of Bread

Ingredients
(A)
Bread flour 480 gm
Plain flour 120 gm I use self rising cake flour as I ran out of plain flour
Caster sugar 110 gm
Milk powder 20 gm
Dry yeast 4 tsp - I used 2 tsp, sufficient to rise
Bread Improver 1 tsp (optional)


(B)
Cold water 350 ml


(C)
Unsalted butter 60 gm
Salt 10 gm
30g salted butter


Method
1. Mix (A) till well blended (just use a spoon to stir to mix well). Add (B) to form a dough. Add in (C) and knead until dough is elastic and smooth.
2. Gather dough to form a ball and cover dough with cling wrap and let it rest for abt 50-60 mins or double in size.
3. Divide dough into portions of 50 or 60 gm each. Shape into balls and leave it to rest for abt 10 mins.
4. Roll out dough and wrap with desired fillings. Shape as required and let it proof on lined or greased baking tray for another 50-60 mins or until dough is double in size.
5. Egg wash dough. Bake dough at 180-190C for abt 12 mins

To freeze:
1. For those who would like to freezer unused dough. Stop at Step 3. After shaping dough into balls straight away keep the dough properly in container in the freezer compartment for later use.
2. When ready to use, slightly flour the tabletop and take the dough out to thaw. When dough is thawed, roll out the dough and add in fillings and shape it. Leave it on baking sheet to prove for abt an hour or until it is double in size. Bake as per normal.

Baker’s Notes:

  • This recipe produces a very pliable dough. There's no need to add more oil or flour when handling it. For this, I believe will be THE recipe for beginners.
  • The bread is soft on the first day, but start to get drier thereafter.


PS: Sheen says the bun looks like a frog with it's dangling tongue! I really have to brush up on my bread shaping.

Kreative Blogger Award

Thanks Anncoo for passing the Kreativ Blogger Award.
It's been awhile since we play this tagging game, so I am more than game to do this on a boring Thursday night (or Friday morning).


1. I am a Singaporean, and proud to be a Singaporean. But I cannot understand why we call ourselves a first world country, yet we act like 3rd world when the MRT door opens!

2. I am one of those rare middle class family who do not have a maid (domestic helper, to be politically correct). Incidentally only upper class people in first world country has a maid to order.

3. People still go "agh" whenever I declare that I am the official maid to my 2 babies at home.

4. My 2 babies - one by birth, one by marriage

5. The most stressful question to me is "how are you"- are you really interested to know that how I am or you just ran out of things to say?

6. Watching Little Sheen's development is one of the 7 wonders on earth, and I am just glad not to missed any of those. Even if it means foregoing a couple of progressions in work (I never think that as a career, btw)!

7. On that note, btw, it is important to say here that I love my job, just in case my boss is also reading this!

I have to pass this on to the bext 7 bloggers.... Urm, now let me hit the sack first and think thru on my dreams!

Have a Happy Friday, and great weekend ahead!

Monday, July 13, 2009

Healthy Mango Pomelo Sago Dessert 杨枝甘露

I made this dessert today cos the sago is almost approaching expiry date...

In my personal opinion, 杨枝甘露 = 蜜瓜西米露 in the eighties. Every decade will have their signature dish, and their due glory until a new dish comes along. Wouldn't you agree that life is pretty much the same too!

The original recipe uses coconut milk which impart a very sweet and aromatic flavour to the dessert but is very high in saturated fat. So I replaced it with yoghurt drink + fresh milk.
As I was tasting the dessert, I had the impulse to dash out of the door to get a pack of coconut cream... but again, its a choice - good food or healthy food.

It is quite easy to make this - the qty is used as a guide only. I add more sugar, less milk, more mango along the way until it taste the way I like!

*~*~*~*~*~*~*~*~*~*~*~*~
杨枝甘露
adapted from YumYum Magazine

What you need:

Haha, I forgotten about the mangoes!!!


Ingredients:

Mangoes ~300g, puree
Mangoes ~200g, cubed
Pomelo 300g, segmented
Sago 100g
Mango Yogurt Drink 500ml
Sugar 2 tbsp
fresh milk, 100ml


To make:
prepare sago: soak rinsed sago in a pot for 30min. Add it into a big (I mean BIG) pot of boiling water. You need a big pot cos the sago will expand thrice the volume when done. Leave it to boil until the sago turn translucent, off the fire. Run the cooked sago under running water. Drained and set aside.
  1. Dissolve the sugar in fresh milk.
  2. Add (1) with mango puree, mango cubes, pomelo, sago and yoghurt drink into a big pot.
  3. Chill well before serving.
*~*~*~*~*~*~*~*~*~*~*~*~

BTW, I just decided to get some coconut milk tomorrow =p
Notes:
Pls use the above quantities as a guide. I have made so much changes as I progressed; expect the proportion may be way out.

Friday, July 10, 2009

My Angel


We had a gathering with my primary school classmates and teacher last weekend. Great, Sheen had companions to play with. Few kids came with the portable game machine, PSP and Game Boy. Sheen derived enormous mystifiying joy from watching others play the game. Not from playing them. Several occasions we offered to buy him one but he declined politely.


While I was busy catching up with my old friends I heard the familar sounds reasoning with his new friend:

>May I just watch you play?

> The girl turned the game console to an angle that he would see nothing. Then he moved to the side where he can continue to watch the playing.

> I only want to see, I won't disturb you or take your game away. Can I?

> Once again, the girl moved the game console away from Sheen. Pay little heed to what he had just said.

Seeing what happened, I swiftly moved to Sheen and squat in front of him to tell him how he made me proud to have done the right thing by asking and reasoning patiently. If his friend does not want to share for her own reasons, he should just move on respectfully.


I do not know if I could have done anything better to mitigate his disappointment but he sure had made me believed that god had sent me an angel 4 yrs ago!

Check Spelling
This Angel Food Cake is for you, Sheen.

This is my little glummy boy on a Monday morning:


Wednesday, July 8, 2009

Sunflower Seed Boule


The same bread... adding a handful of sunflower seeds. Sunflower seeds is inexpensive yet full of goodness !

To feed my family wholesome food like these seeds, I will have to add them into the food like this.

Saturday, July 4, 2009

Cinnamon Bread

Using the same sweet sandwich bread .


I sprinkle some cinnamon sugar , then roll it up. I was thinking of the cinnamon roll but was not up for the extra work it entails. So I simply roll it up & leave them in a baking tray.


Unfortunately I did not bake the bread very thouroughly, the inside (bottom) of the bread is still wet and gummy. *sigh*

Friday, July 3, 2009

Amazingly Easy Artisan Bread


I got to know of this no-knead bread from Laureen - Eat and Be Happy.

I always equate hard work to great taste. You know instant noodle can only taste like instant noodle, right? So I was sooo sooo sooo skeptical about this new bread making technique. I even told J, if this technique works, I am dash out to buy all their books!

Being a suspicious cautious I first trialed with 1/3 of the portion. Here's the recipe I used if you are just as cautious as moi.

***************************
Artisan Bread in 5 minute

lukewarm water 1 cup
granulated yeast ½ tsp
coarse kosher or sea salt 1 tsp
unsifted, unbleached, all-purpose white flour (e.g. Gold Medal) 2 ¼ cup

  1. Mix the yeast and water together in a large bowl. Mix in the flours and salt, using wooden spoon, until all the dry ingredients have been incorporated. Do not knead.

  2. Cover the bowl with plastic wrap and allow to rest at room temperature until the dough rises and collapses, approximately 2 hours. The dough should have a flat top and bubbling with holes.

  3. Cover the dough loosely with a cling wrap and store in refrigerator (not the freezer) for up to 14 days.

  4. To bake Pull off however much of the dough you need depending on the size of the pan you use (I used up all the dough, and used a flat baking tray). Flour the work surface generously and shape the dough into a ball. Place the dough in a lightly greased loaf pan and let it rise at room temperature for about an hour.

  5. Preheat the oven to 225C with an empty baking pan on the bottom shelf. Pour about 2 cups of hot water into the baking pan just before you put the bread in. Bake the loaf for about 20 minutes or till golden brown and firm. Remove the loaf from the pan and let cool completely before slicing.
***************************
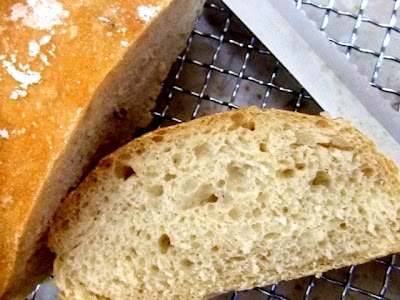
I made them into 2 boules. The first one has more flour, resulting in smaller holes in the bread:

The 2nd one has much less flour, giving bigger holes:


What I like about this bread is that it is so basic, containing nothing more than flour, water, salt and yeast. No emulsifer + tens of other chemicals as the commerical bread do!
It has crispy golden-brown crust while the inside is soft, moist and spongey. It beats any store-bought gourmet bread! The best part, just need 5 min, and you will be handsomely rewarded with the best bread ever!