Pages

Banner

Thursday, June 17, 2010

Tokyo Banana


Last night my kind sister nudged and reminded that I have long neglected my blog. Haha, lest I know there's at least 1 person in this whole wide world interested in what I write.

With most things being packed up for the shift, I hardly bake these days. Not that I have the time anyway. I remembered that I had quite a few things that were baked early this year, but never been blogged so I took few min to go thru my folder. And the very first photo I saw was this yummy banana cake which my buddy D brought back from Tokyo.

D told me this is a very popular souvenir in Japan - many people lug this home for their friends and relatives.
Each piece is shaped to look like the banana, and individually sealed, which is convenient for the modern urban people like us but a no-no to the environment. Haiz, but who is complaining!

Beneathe the wrapping is a ultra light chiffon (or is it sponge?) cake with banana cream filling.

The banana cream is delicious, a mysterious yumminess... The scientist in me wondered if it is made with real banana or just flavouring simply becos real banana will turn black in few minutes. To find the answer, I involuntarily reach out for another one, devouring after another, in my feeble attempt to reach a conclusion.

Soon enough the box is empty, and I am even thinking of ordering some on line and have then shipped to Singapore... hahaha, but the shipping cost is exorbitant!

D suggested that I made my own version which I think I would need years of research... but thanks for even thinking that I have the skills and knowledge to replicate this airy yummy stuff in my humble kitchen!

Thanks D for the "discovery" in Tokyo, and be sure I will send you a box if I succeed.

Thursday, June 3, 2010

London Calling

I gone MIA again.

This time I was put on a west bound flight right after I returned from my family vacation at Club Med. I was expecting to have a nice warm summer in London, just like the sunny Cherating I basked with my family the week before.

But I was so so wrong, I had a miserably cold summer this morning. For tempearture of 16C, I was shivering all the way from hotel to the office. Lucky me it was a short 3 min walk!

Here's some pix taken at this trip:


nice new lounge at the Terminal 3!


going for healthier choices... or rather wanting to look classier snacking on fruits. :-)

Most ppl I know hates the airline meals, but I am among the few rare species that really enjoy the food served at 40,000 ft!
Buckingham Palace, London

Parliament Sqaure, London

The Millenium Eye, London.
taken this pix from my hotel window.


I was pleasantly surprised that the room is actually quite spacious.

You know what I did in the 13+hour flight? Listened and watched Jerry Yen through and through!

Thursday, May 27, 2010

Happy Birthday J!


J does not like cake. He finds the cream more "yucks" then "yum", so this birthday I thought a birthday cookie will delight him.

I used the usual chocolate chip recipe, and baked it in the Pooh mold. Nutella is used to paint the eyebrown etc... really simpler and faster than baking a cake which will not be appreciated after all. :-)


This celebration means alot to us - I am grateful to him for putting his career on hold so that I can fulfil my dream to live in a the angmoh city! I am not good in saying anything mushy... just want to borrow this part from my fav drama "Down with Love" :

"...能够遇见你认识你喜欢你爱上你
感谢我每滴眼泪... "


---------------------
Will post the recipe shortly; am having problem with my word document now :-(


------------------------

Updated 30/8 with recipe:

Modified from here :

Chocolate Chunk Cookie

2 cups (260 grams) all purpose flour
1 1/4 teaspoons baking soda
1/4 teaspoon salt
3/4 cup (170 grams) unsalted butter, room temperature
1/2 cup granulated white sugar
1/4 cup packed light brown sugar
2 teaspoons pure vanilla extract
1 1/4 cups (210 grams) chocolate chips

  1. Preheat oven to 350 degrees F (177 degrees C). Place one oven rack in the top third of the oven, and one oven rack in the bottom third of the oven. Line two baking sheets with parchment paper.
  2. In a large bowl, whisk together the flour, baking soda, and salt.
  3. In the bowl of your electric mixer, cream the butter and sugars until light and fluffy (about 2 - 3 minutes). Scrape down the sides of the bowl. Beat in the vanilla extract.
  4. Gradually add the flour mixture to the creamed mixture and beat just until incorporated. Scrape down the sides of the bowl as needed. Stir in the chocolate chips.
  5. Roll the dough into about 1/4" thick. Press the mould over the dough, and remove the excess. ALternatively, put some dough inside the mould, and use a spoon to flatten out the dough, and fill up all the edges.
  6. Bake the cookies for about 15-17 minutes, rotating the baking sheets halfway through the baking time.
  7. The cookies are done when they are light golden brown in color and just set. They will still seem a little soft but they will firm up as they cool. Remove from oven and let the cookies cool a few minutes on the baking sheet before transferring them to a wire rack to cool.

Friday, May 21, 2010

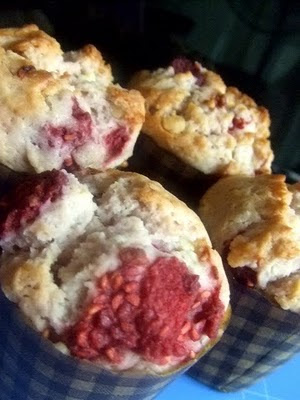
Nigella's Raspberry and White Chocolate Muffins


Finally, I am back to my blog.

You see I have been really busy getting ready to move to a new city soon. Trying to stuff a 1600sq ft apartment into a 20 foot container is killing me. I had to go thru all the junks that I have collected over the 8 years, deciding if the item should be shipped, given away or just dump...

In addition, I had to manage a handover to my colleague, onboarding for my new job, running around gathering the daunting list of documents for the visa application.

I am exhausted at the end of the day, leave alone baking or blogging.

I ask for your forgiveness. I lied. Yes I should be busy packing up, doing a orientation for the poor chap who has to take over my work in Singapore. And yes, i should be busy with the visa thingy. But truth is, i have done little in those are where I should have.

What is taking up all my time and energy is the silly Happy Aquarium in Facebook. First I played the game using Sheen's account... then slowly I realised that I need to have more "neighbours" to help me get ahead in the game. So I played with my account, Hubby's account etc. I even went to the extend to research what type of fish helps me make more profit etc. All in the name of a silly virtual pets!

Yo. Absolutely time waster. And I ought to be ashame of myself!

It must be between the fish feeding that I managed to find time to make this muffins. These are the leftover raspberries from my niece's birthday cake which needs to be used up before it is gone for good!

I picked muffin cos it takes very little time to prepare. Simply fold in the wet ingredients into the dry. Bake. Done.

Tartness from fresh raspberries complements very well with the sweet white chocolate. The colour goes very well too!

Enjoy, while I get back to tend my tanks!
------------------------------
RASPBERRY AND WHITE CHOCOLATE MUFFINS
Recipe from here

INGREDIENTS
300g plain flour
2 tsp baking powder
150g golden caster sugar
1 egg
1 tsp vanilla extract
225ml milk
50g butter
approx. 100g raspberries
approx. 110g white chocolate
some muffin cases


METHOD

1. Pre-heat oven to 200/gas mark 6
2. Half the raspberries and chop chocolate into large chunks.
3. Sift flour and baking powder into large bowl.
4. Stir sugar into flour mixture.
5. Melt the butter (I find this easiest in microwave for approx. 30 seconds)
6. In separate bowl crack the egg, whisk in the vanilla extract, milk and melted butter.
7. Stir the liquid mixture into the dry mixture.
8. Fold in raspberries and white chocolate (Using a metal spoon is best as this avoids most damage to raspberries.) Be careful not to be too rough, as raspberries will be easily damaged.
9. Cook for approx. 30 minute or until muffins are risen and firm.
10. Enjoy best warm, but careful for hot chocolate!!

Sunday, May 9, 2010

Rush Rush


I know I have been missing for too long... for reasons I will explain in my later post.


For now, I wanna share this raspberry cake which we had for my 3-yo niece's birthday a fortnight ago!


This cake was made in record time. I started baking on Saturday morning, and in between I took Sheen to his swimming lesson and cleaning him up afterthat. It's a wonder I managed to get everything ready when daddy came back to fetch baby and I at 11.30am.


Happy birthday girl Si-Ting with her favourite cousin on her left:


The cake is a 3 layer sponge cake with fresh raspberry filling:


My brother told me his girl loves strawberries, and I was suppose to make just that. The last time, I bought the strawberry 1 week in advance which gives plenty of time for them to turn moldy. So this time, I am smarter: i happily went to supermarket on thursday... All in all, I went to 4 supermarkets in my precinct... Can't believe that no one has any strawberries on the shelf!!!

In the end, i bought raspberry... haha, at least the colour is the same :-)

Friday, April 16, 2010

Holiday I - Tian Tian Seafood


I went up North in the past week with my family in tow. Armed with a GPS and a well-fueled car, we went to hunt for this "ulu" restaurant that is over 20km away from our hotel. This simple restaurant was introduced by my local colleague at my last trip... we supposed to meet up again to have a nice meal there but he was unfortunately ill at the very eleventh hour. So we were left to venture there on our own.

Apart from the 2 cemetries that we past, the journey is quite pleasant.

This is the restaurant menu:


We ordered stir-fried sliced fish with spring onion (薑蔥魚片), 300g of steamed prawns(清蒸鮮蝦), oyster egg (蠔蛋) and green vegetables (菜心).

Fish, prawns and veg are great - very fresh. The cooking is very home-style, which my family loves. The oyster egg is very special - it is crispy type. The only other place I eaten this type of oyster egg is at Beng Hiang, a local hokkien restaurant. But if you are expecting the big fat oyster that is commin here, then this may be a wee bit of disappointment.

The total bill came up to RM64 (~S$28), including drinks.

There were a few more dishes that we are keen to try, but the lady boss kept telling us 4 dishes was just right for us. 谢谢你, 老板娘!


----------------------


Restorant Tian Tian Seafood
Kuala Lukut Chuah
71960 Seremban
Tel: 06-668 1233, 016-926 3881

Friday, April 9, 2010

Chicken Soup for the Soul


I was feeling a little blue with the daunting thoughts of living in a brand new city shortly. For some it may thing it is a dream comes true. For me, it was more jittery than excitement. And trust me, i am still looking for loophole how I can myself out of the decision I made in haste.

After stumbling upon Mary's blog, I spent hours reading thru all her dated posts and, boy, I was glad I did. I felt rejuvenated and empowered like I just walked out of a session with my life coach! Only that it didn't leave me a cent poorer! Ha.

Aside from feeding my soul, I also picked up a good recipe that fed my stomach well!
Since I have only oranges in fridge, I use that instead of oranges. Here's my version of the orange cake:


Simple Orange Cake
Recipe adapted from here
125g butter
grated rind from 2 big oranges
1C castor sugar*
3 eggs
1/2C milk
1 & 1/2 C self-raising flour
1/4C orange juice (I used the ready-to-drink type)
3 tbsp poppy seeds.

Method:
Put everything (except poppy seeds) into a mixing bowl and beat until smooth and changed in colour. Fold in poppy seed.
Pour into a tin lined with baking paper and bake at 180 degrees Celsius for about 40 minutes or cooked. It’s cooked when a skewer inserted into the centre comes out clean. You can dust with some icing sugar or pour syrup over it.
  • Syrup - I read from The Cake Bible that syrup helps to keep the cake moist and tender. Simply use water/orange juice + sugar to make simple sugar. Cake that has been basked with syrup also keeps better than those without. If you are not serving the cake to kids, you can also basked with Cointreau or Grand Marnier - I used this - I love liquor in my cake!
  • * Sugar - I reduce the sugar to 1/2 cup since I used sweetened orange juice (ready-to-drink type).
  • Poppy seed - I only added 1 tbsp in the cake... that why you do not see many "spots" in my cake. I am gonna triple the amount next time round!
This is a very easy recipe for beginners, and you have only 1 bowl to wash! A simple yet reliable recipe.
If I must complain, I think the orange flavour is too subtle. Maybe I will need to use more orange zest.